Powerflasher, in collaboration with Influxis, is proud to release the second public alpha of the haXe plugin for FDT!
This new version builds on the first alpha by providing a greatly enhanced auto-completion system, complete with automatic imports and class lookup, as well as a much needed improvement in compiler configuration by supporting the use of HXML project files. We at Powerflasher now feel that the haXe plugin for FDT provides the ultimate coding experience for the haXe language.
Here’s an up-to-date roundup of the features supported in the alpha 2 release:
· Live error checking
· Greatly enhanced auto-completion capability
· Syntax coloring
· Class / Enum / Interface file creation wizards
· Full HXML file inclusion
Installing the haXe Plugin Alpha 2 Release
If you are new to the haXe plugin alpha for FDT, you can install quite simply by following the steps below.
1. First, download the latest version of FDT4 Beta release by visiting this link and install it.
2. Download the haXe installer for your operating system from http://haxe.org/download.
3. Run the haXe installer, selecting Yes when asked if you wish to install the Neko runtime.
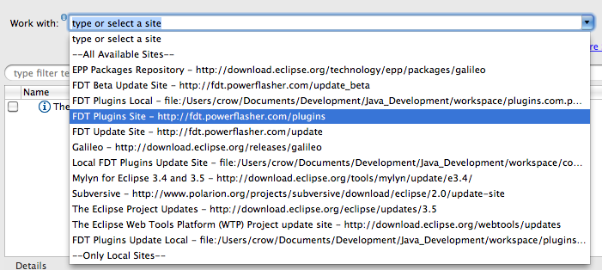
4. Select the “FDT Plugins Site” update site. (If it is not included in your drop down menu, enter: http://fdt.powerflasher.com/plugins in the “Work with” text input and hit return)
 5. Select the option “FDT haXe plugin” from the items presented and click Finish. Allow the installation to complete.
Configuring the haXe Plugin
Before the newly installed haXe plugin can be used, it will need to be configured so it knows where to find the haXe compiler on your machine. To do this, select Window->Preferences from the menu and navigate to the HaXe->SDK option. You should be presented with a textfield control with the label HaXe SDK Location. Click the browse button next to this field and navigate to where your installation of the haXe compiler exists, then click OK on both dialogs to close them. On windows machines, the haXe installation will usually exist at the location:
C:\Motion-Twin\haXe
Mac OSX users may want to try:
/usr/lib/haXe
Using the haXe Plugin
Now for the fun stuff. Create a new AS3 project by selecting File->New from the menu and choosing “Empty AS3 Project” from the presented list of options. In the field titled Project name, enter “Hello haXe”. Now click OK.
Now, right click on the src directory in the project file tree and select New-> Haxe Class. If this option does not appear in the context menu, FDT will need to be refreshed. You can do this by selecting the menu option Window->Reset Perspective.
When the new class dialog is displayed, give the class the name “Main” and click OK. A new file should now exist in the src directory.
We now have a haXe project and class file, which is great, but we haven’t yet told the haXe compiler what type of project we’re building. To do this, right click on the project node in the file tree pane and select Add HaXe Project Nature. This will raise a new wizard. You can immediately click the next button, as we are not interested in modifying the haXe SDK location for this project.
The second screen in the new wizard provides the option to specify the target platform for our project. Currently, this includes:
· Flash9 SWF (AVM2 target)
· Flash SWF (AVM1 target)
· Javascript
· AS3 Code
· Neko Binary
· PHP Code
· C++ Code
Each of these target platforms are fully supported by the FDT plugin and we recommend that you play with this option at your leisure. However, for this example, choose the Flash9 SWF option.
If you look in your project file list, you should notice a new file with the extension “.hxml”. This is your project compiler settings. You can alter this file by right-clicking it and selecting Open With->Text Editor. Simply double clicking the file will launch the haXe compiler if using the Windows installation of FDT.
The haXe plugin supports a wealth of compiler switches and options, and we advise that you read about them on the haXe website at http://haxe.org/doc/compiler.
Open the Main class and enter the following code:
package;
class Main {
public static function main() {
trace( “Hello, World” );
}
}
Save this file and run it. A new SWF file will be compiled into your project directory.
We at Powerflasher, along with Influxis, are very excited about the new possibilities provided by this plugin and, as always, we would welcome any feedback, bug notifications and feature requests you may provide. We encourage all such information to be posted on our issue tracking website. With your help, we aim to make FDT a truly unique experience for applications development.
What’s Next?
We are currently busying away on the haXe plugin for a major Beta release. This will include the ability to create haXe projects using FDT’s fully integrated project wizard as well as being able to compile and launch directly within the FDT workflow. We aim to make FDT the best haXe development environment available just as it is for Flash!


 5. Select the option “FDT haXe plugin” from the items presented and click Finish. Allow the installation to complete.
@Rhett
Not yet, but please take the time to add it as a features request. This helps us determine what’s more important to the community.
http://bugs.powerflasher.com/jira/browse/FTDHXPLIN
Is debugging supported yet?
Great work guys, seems like i will be having fun today playing with this. Go haXe. 😉
Nice work! When this plug-in comes out of beta, I want to order licenses for my whole team.