Today I’d like to release a quick demo about a setup for using Away3D 4.0 with your FDT projects. We’ll even have an example of loading a Wavefront .obj file and using it in your project. Before we get started, I’d like to thank Michael Plank for providing the sample project and it’s assets. The 3D ship model that we’re loading is also from his upcoming game Delta Strike. The game is really looking great and I recommend everyone check it out.
Sample Project

If you haven’t setup your SDK for AIR 3.0 Beta2 and Flash Player 11 Beta2, you’ll need to do that. You may also get an SDK warning if you’re SDK has a different name. If you know you have you’re SDK setup up for AIR 3.0 and Flash Player 11, then go ahead and reassign the SDK to the one on your system. Learn more about SDK management here.
Video
I’ve created a quick video that goes through the process. You can watch it below. If you prefer text, that is included further down.
Setting Up Your Away 3d Library
Create Your Library Project
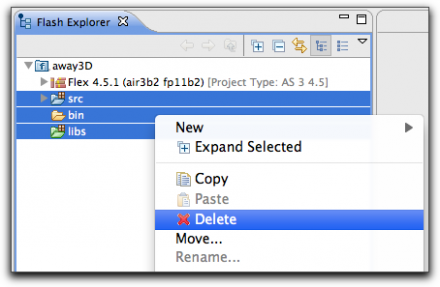
Before downloading the latest Away 3D source code, we need a place to put it. Fire up FDT and create an empty project and name it ‘away3D’. Once that’s done, select an SDK that has been prepped with the latest Flash Platform releases (see a previous blog post about it).
One that is done, go ahead and delete all the folders in the project. Since this is just going to be used for reference, we don’t need any of those folders – just somewhere to place our source code.
Download Away3D 4.0
If you have a github account and use OSX, using the Github OSX client is a great way to make sure you always have the latest Away 3D library. Do this by navigating to the Away 3D repository and choosing ‘Clone in Mac’. When the Github client opens, navigate to your ‘away3D’ project and download it to there.
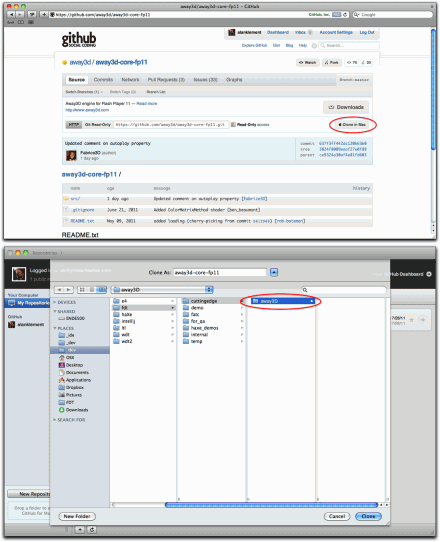
For windows users or anyone who isn’t interested in using the OSX Github client can either use the command line to download the library, or simply download the library as a .zip.
Setup Your Away3D Library Project
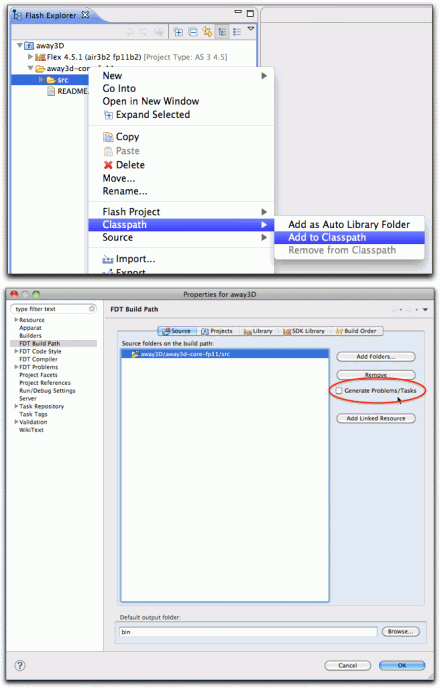
Once you have the away3D library in your project, add the nested ‘src’ folder as a source folder to your project. Once this is done, let’s go ahead and turn off errors for this project. Do this by navigating to your project’s settings and uncheck ‘Generate Problems / Tasks’. This will help keep things more tidy as FDT will not worry about checking this project for warnings or errors.
Now your library project is setup.
Import and Run The Sample Project
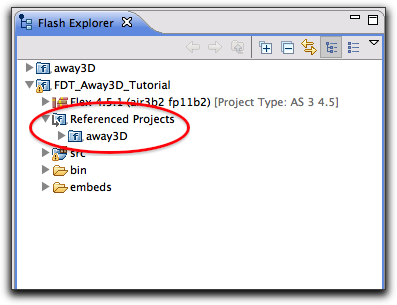
Next, simply import the project into your workspace (see this wiki article on how to do that). With the project open you should see that it is already looking for a project named ‘away3D’.
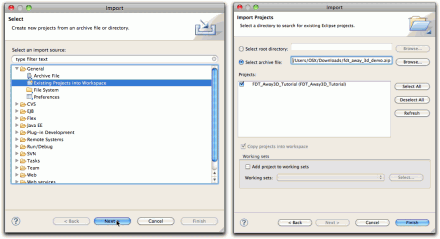
If you have named your Away3D library project with a different name, link to that instead (again see our Project References wiki article on how to do that).
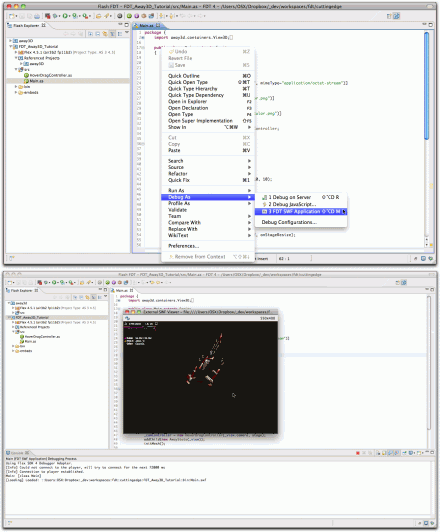
To run this project simply open the Main.as file, right click on the file on the Editor and choose Debug As>FDT SWF Application. FDT will take a second to compile (the first compile will take a few seconds) and then the application will run.
Analyzing The Setup
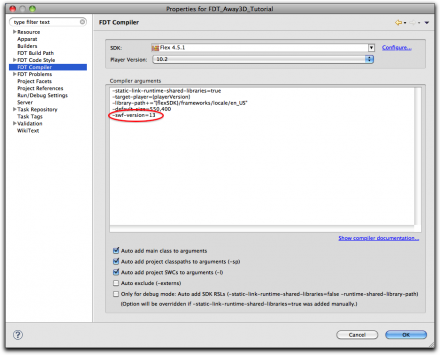
There are a few important notes when working with Away3d 4.0 and the latest SDKs. You’ll first have to download the latest beta SDKs, of course, but you need to make sure you have the proper compiler and embedding arguments. When targeting this new Flash Player, you’ll need to make sure you have the ‘-swf-version=13’ compiler argument. If you’re using the sample project, it will already be added.
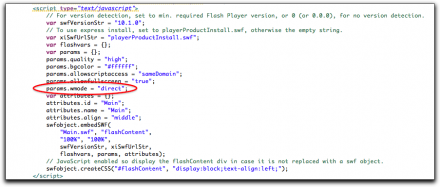
Another ‘gotcha’ is to make sure you’re properly embedded the .SWF into an HTML page. The trick here is the ‘params.wmode = “direct”;’ argument.
All the test is in the code, so check it out. You’ll see how the 3D model (a Wavefront .OBJ file) is embedded into your application, and then skinned and lit. It’s surprisingly easy. Enjoy


If that is the case, you’re probably hitting one of the ‘gotchas’?
Runtime or compiler error?
Compiler error = wrong sdk or arguments
Runtime = wrong runtime or embeded in html wrong.
When I try to run this I get an error telling me that Context 3D is not available. Any idea why?