
The community has been screaming for haXe support in FDT. We are thrilled today to announce the public alpha release of the FDT haXe plugin!
Developed in collaboration with Powerflasher and Influxis, the FDT haXe plugin provides developers a powerful tool for authoring the haXe multi-platform language. Our goal is to provide the best haXe coding experience and that it feels like coding in the AS2, AS3 or MXML editor of FDT: same shortcuts, same syntax coloring, same coding comfort.
Here’s a feature overview of the public alpha version:
- Live error checking
- Autocompletion (variables and functions)
- Syntax coloring
- Code editing features
- Open Type
- New Class/Interface/Enum wizards
You can follow our development progress on Twitter @FDThaXe
Watch the first live demo of the FDT haXe plugin I showed at Flash Camp Manchester in the recording from Adrian Parr starting at minute 38 here.
Getting started with the FDT haXe plugin (alpha version)
Installation
- Download the latest version of FDT4 Beta release here
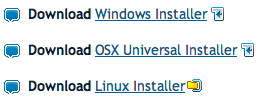
- Go to http://haxe.org/download and download the installer for your OS.
- Run the installer.
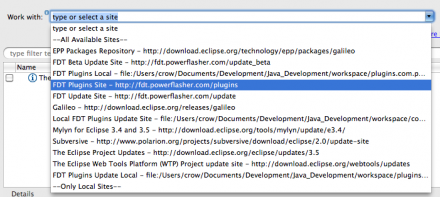
- Start up FDT 4 and select Help > Install new Software
- Select the “FDT Plugins Site” update site. (If it is not included in your drop down menu, enter: http://fdt.powerflasher.com/plugins in the “Work with” text input and hit return)
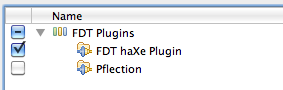
- Select “FDT haXe Plugin” from the plugin list, hit finish and follow the final installation steps.
Setting up the haXe Plugin
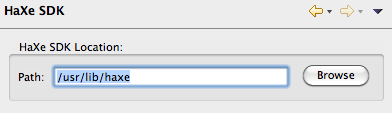
- First of all you need to configure the haXe SDK: Go to Preferences > haXe SDK and insert the haXe installation directory
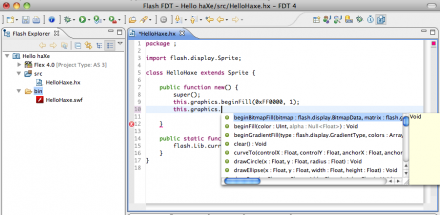
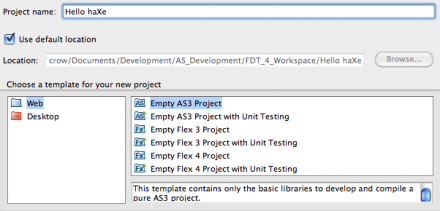
- Now create a new “Empty AS3 Project”, name it “Hello haXe” and click Finish
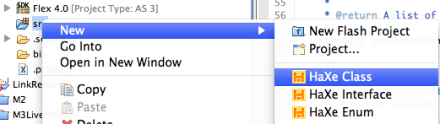
- Right click the src folder and select New > HaXe Class (if you don’t see it select Window > Reset Perspective from the Menu)
- Call the new Class “HelloHaxe” and click Finish
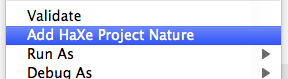
- Right click the Project and select “Add HaXe Project Nature”
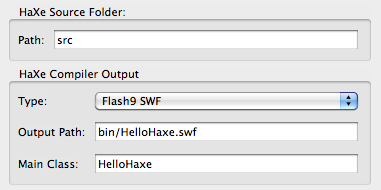
- Click Next and set the Type to “Flash9 SWF”, the output file to “bin/HelloHaxe.swf” and the Main Class to “HelloHaxe”
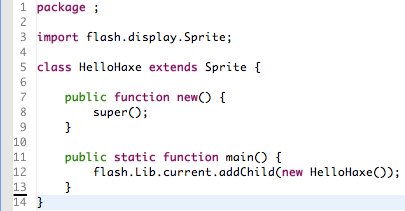
- Extend Sprite and add the constructor and the static main function. The final class should look like this:
That’s it, you’ve successfully set up your first FDT haXe Flash project!
Start Coding
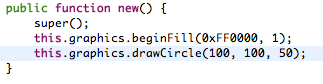
Start adding code in the constructor for example:
Please note, the SWF is compiled on every Save, no specific launch configuration is available yet. This is our first Alpha release, please bare with us !
For any feedback, feature requests, improvements, bugs and other issues we encourage you to use our community driven tracking website to make the haXe support in FDT the greatest ever.
We would also advice to subscribe to the haXe mailing list, it is a very active group with smart people and interesting topics.
On the behalf of the FDT Team and Influxis, I hope you are as excited as we are and enjoy the first available version of the FDT haXe plugin,
Michael Plank


[…] the alpha release of FDT haXe plugin […]
This is definitely step in the right direction, if it will be fully functional with all the bells and whistles i will go and buy FDT even when i just bought the Flash Builder Premium edition. Since i do work with haXe quite a lot using Flash Develop but its just not good enough.
[…] FDT haXe plugin alpha version released View Comments […]
[…] New Project Wizard newly defined and customizable Project Types and Templates the alpha release of FDT haXe plugin support for the new MXML 2009 language features like Spark, FXG, States and the new language […]
This is awesome. I’ve been using it for the entire day. This is much easier and faster than using a text editor and command line compiling. I’ll be talking to my employer to get an FDT license for sure.
Hi Michael, I’m fairly new Haxe myself but if I think of anything I’ll log it.
re: compilation on save
unchecking ‘Build Automatically’ is one of the first things I do 😉
@Fintan No way to add compiler args yet.
What do you think about the “compilation on save” strategy we have right now? We definitely need a Launch configuration where you can set the Player/Viewer. We could also add compiler args options to that launch config.
Would be nice if you could log your ideas and thoughts about compiler args to the Jira Tracker (link above).
Thx!
[…] http://fdt.powerflasher.com/blog/?p=2233 […]
great. now I can go back to using my MacBook in the evenings 🙂
Is there a way to add Haxe compiler arguments?
Very big thumbs up guys.
I didn’t really believe this plug-in was going to be released when I first saw it on the FDT4 roadmap.
A decent IDE was the only thing that kept me from coding haXe,
as the language and the compiler are dope!
[…] Eine genaue Installations- und Getting-Started-Anleitung sowie weitere Informationen gibt es hier am FDT-Blog. […]
[FDT] – plugin HaXe en alpha test…
Le genre de nouvelle qui fait vraiment plaisir. 🙂 Annoncée sur le blog de FDT, en collaboration avec Influxis, l’équipe de Powerflasher vient de rendre publique une version alpha d’un plugin HaXe….
[…] This post was mentioned on Twitter by Michael Plank, Ain Tohvri and Arul Kumaran, Matan Uberstein. Matan Uberstein said: RT @Michael_Plank: I'm very excited to announce the release of the FDT haXe Plugin alpha version! http://is.gd/dBNMv #haxe #fdt4 #influxis […]